GitLab Pages: Your Free Ticket to Hosting Static Websites with CI/CD Magic!
So you’ve got a cool static website – a blog, a portfolio, some documentation – and you’re looking for a place to host it. What if I told you that GitLab, the platform you might already be using for your code, offers a free and powerful solution called GitLab Pages?
This blog post is your easy-to-understand guide to getting started with GitLab Pages, even if you’re a beginner. We’ll cover:
- What GitLab Pages is and why it’s awesome.
- How it uses CI/CD (Don’t worry, it’s simpler than it sounds!).
- A step-by-step example to get your first site live.
Let’s dive in!
What is GitLab Pages?
GitLab Pages is a static site hosting service offered by GitLab. It allows you to host static websites directly from a GitLab repository. Think of it as a free web server built right into GitLab, perfectly suited for:
- Personal websites and portfolios.
- Project documentation.
- Simple blogs (using static site generators like Jekyll or Hugo).
- Landing pages.
Why is it awesome?
- Free: Yes, you read that right. Free hosting for your static websites.
- Easy to use: Integrated directly with GitLab, making deployment a breeze.
- Automatic deployments with CI/CD: Every time you update your code, GitLab Pages can automatically update your website.
- Custom domains & SSL: Use your own domain name and secure your website with HTTPS.
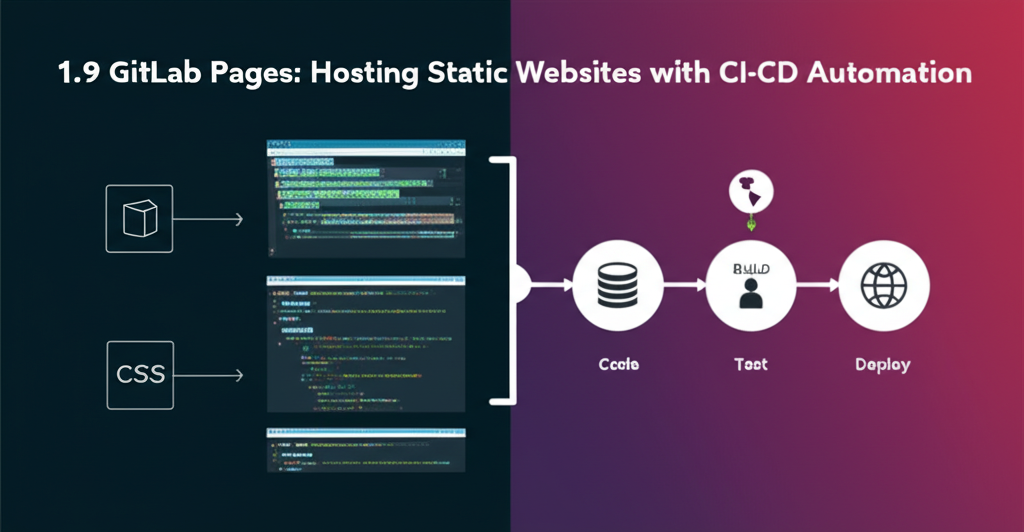
CI/CD: The Secret Sauce
Now, let’s talk about CI/CD, which stands for Continuous Integration/Continuous Deployment. It might sound intimidating, but in the context of GitLab Pages, it’s really just a way to automate the process of building and deploying your website.
Here’s the breakdown:
- You push code to your GitLab repository.
- GitLab detects the changes and triggers a “pipeline.”
- The pipeline runs a set of instructions (defined in a
.gitlab-ci.ymlfile) to build your static website. This might involve using a static site generator like Jekyll or Hugo to convert Markdown files into HTML, CSS, and JavaScript. - The pipeline then publishes the built website to a special directory called
public. - GitLab Pages then serves the content of the
publicdirectory as your website.
In essence, CI/CD is the automated magic that transforms your code into a live website with every commit!
Getting Started: A Practical Example
Let’s build a very basic website using just HTML, CSS, and JavaScript. No complex static site generators needed for this example!
1. Create a New GitLab Project:
- Log in to your GitLab account.
- Click on “New project” and choose “Create blank project.”
- Give your project a name (e.g., “my-first-gitlab-page”) and make it “Public” so everyone can see your website.
- Click “Create project.”
2. Create Your Website Files:
Create the following files in the root directory of your project:
index.html: Your main webpage.<!DOCTYPE html> <html> <head> <title>My First GitLab Page!</title> </head> <body> <h1>Hello World from GitLab Pages!</h1> This is a very simple website hosted on GitLab Pages. </body> </html>.gitlab-ci.yml: This file tells GitLab how to build and deploy your website.image: alpine:latest # Use a lightweight Linux image stages: - deploy pages: stage: deploy script: - echo "Deploying to GitLab Pages..." - mkdir .public # Create a temporary directory - cp -r * .public # Copy all files to the .public directory - mv .public public # Rename .public to public (required by GitLab Pages) artifacts: paths: - public only: - main # Only deploy from the 'main' branch
Explanation of the .gitlab-ci.yml file:
image: alpine:latest: Specifies the Docker image to use for the build environment. Alpine is a lightweight Linux distribution, making the process faster.stages: - deploy: Defines a single stage called “deploy.”pages:: Configures the GitLab Pages deployment.stage: deploy: Assigns this job to the “deploy” stage.script:: Contains the commands to run.echo "Deploying to GitLab Pages...": Prints a message to the console.mkdir .public: Creates a temporary directory called.public.cp -r * .public: Copies all files from the project root to the.publicdirectory.mv .public public: Renames the.publicdirectory topublic. This is crucial! GitLab Pages looks for thepublicdirectory to serve your website.
artifacts:: Specifies the files to be saved as build artifacts.paths: - public: Tells GitLab to save thepublicdirectory as an artifact.
only: - main: Specifies that this job should only run when changes are pushed to themainbranch. You might need to change this tomasterif your repository uses that branch name.
3. Commit and Push Your Code:
- Add all files (
index.html,.gitlab-ci.yml) to your GitLab project. - Commit your changes with a meaningful message (e.g., “Initial commit with basic website and CI/CD configuration”).
- Push your changes to the
mainbranch of your GitLab repository.
4. Watch the Magic Happen!
- Go to your project in GitLab.
- Click on “CI/CD” -> “Pipelines.”
- You should see a pipeline running. If everything is set up correctly, the pipeline should complete successfully.
5. Access Your Website:
- Once the pipeline is successful, go to “Settings” -> “Pages.”
- You’ll see the URL of your GitLab Pages website, usually in the format:
https://<your-gitlab-username>.gitlab.io/<your-project-name>. - Click on the URL to view your website!
Congratulations! You’ve successfully deployed a website using GitLab Pages!
Next Steps: Taking it Further
This is just the beginning! Here are some ideas for what you can do next:
- Use a static site generator: Explore Jekyll, Hugo, or Gatsby to build more complex websites.
- Customize your domain: Point your own domain name to your GitLab Pages website.
- Add SSL certificates: Secure your website with HTTPS.
- Explore more advanced CI/CD configurations: Learn how to automate more complex tasks during deployment.
GitLab Pages is a powerful and free tool that allows you to easily host static websites. With a little bit of configuration, you can leverage the power of CI/CD to automate your deployment process and keep your website up-to-date. Happy hosting!