Building a Simple Data Lake: From S3 to Glue and Athena for Serverless Querying
Data is the new oil, but raw, unprocessed data is like crude oil – valuable but not immediately usable. To extract real value, you need to refine it. This is where a data lake comes in. In this post, we’ll walk you through building a simple, serverless data lake on AWS using S3, Glue, and Athena. No servers to manage, just powerful data analysis at your fingertips!
What’s a Data Lake Anyway?
Think of a data lake as a centralized repository for storing data in its raw, unprocessed format. Unlike a data warehouse with predefined schemas and rigid structure, a data lake embraces variety. You can store structured, semi-structured (like JSON), and unstructured data (like images and videos) all in the same place. This flexibility allows you to explore your data and discover new insights as your needs evolve.
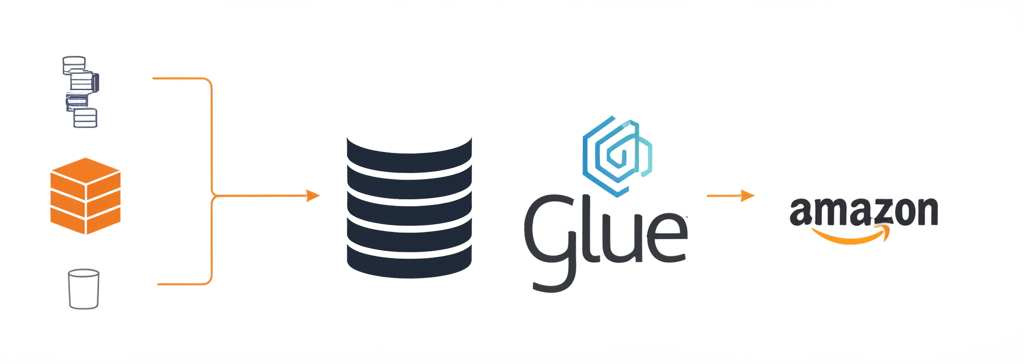
Why Use S3, Glue, and Athena?
- Amazon S3 (Simple Storage Service): Your highly scalable and durable cloud object storage. It’s the foundation of our data lake, where all your raw data resides.
- AWS Glue: A fully managed extract, transform, and load (ETL) service. Glue automatically discovers the schema of your data and catalogs it, making it queryable. Think of it as the librarian of your data lake.
- Amazon Athena: A serverless query service that allows you to analyze data directly in S3 using standard SQL. No need to load data into a separate database. It’s the analyst’s best friend.
Let’s Get Building!
Here’s a simplified step-by-step guide to creating your simple data lake:
1. Set Up an S3 Bucket:
- Log into your AWS Management Console.
- Navigate to S3.
- Click “Create bucket.”
- Choose a globally unique name for your bucket (e.g.,
my-awesome-data-lake). - Select a region that’s closest to you.
- For this example, leave the default settings for bucket ownership, block public access and bucket versioning. (In a production environment, carefully consider these settings).
- Click “Create bucket.”
Congratulations! Your S3 bucket is ready to receive data.
2. Populate Your S3 Bucket with Sample Data:
- Download some sample data. For this example, let’s use a publicly available CSV file of US population data. You can download it from various sources online (e.g., search for “US population CSV sample data”).
- Upload the CSV file to your newly created S3 bucket. You can do this through the AWS Management Console or using the AWS CLI.
3. Use AWS Glue to Crawl Your Data:
Glue needs to understand the structure of your CSV file (schema) before Athena can query it. We’ll use a Glue crawler for this.
- Navigate to AWS Glue in the AWS Management Console.
- Click “Crawlers” in the left navigation pane, then “Add crawler.”
- Crawler name: Give your crawler a descriptive name (e.g.,
population-data-crawler). - Data source configuration:
- Choose “Data source.”
- Choose a data store: S3
- Crawl data in: Specified path in my account
- S3 path: Enter the S3 bucket path where you uploaded the CSV file (e.g.,
s3://my-awesome-data-lake/). You can also point it to a specific folder within the bucket.
- Add another data source: No
- IAM role: Select an existing IAM role with S3 read access (and Glue permissions, typically
AWSGlueServiceRolepolicy attached) or create a new one. Be sure the role has sufficient permissions to access S3. - Schedule: Choose “Run on demand” for this example. You can schedule the crawler to run regularly in a production environment.
- Output configuration:
- Database: Choose an existing Glue database or create a new one. A database is a logical grouping of tables. Give your database a name (e.g.,
my_data_lake_db). - Prefix added to tables: Optional. You can add a prefix to the table names that the crawler creates.
- Database: Choose an existing Glue database or create a new one. A database is a logical grouping of tables. Give your database a name (e.g.,
- Click “Create crawler.”
- Select your newly created crawler and click “Run crawler.” Glue will analyze your CSV file and infer its schema.
4. Query Your Data with Amazon Athena:
Now for the fun part! Let’s query the data.
- Navigate to Amazon Athena in the AWS Management Console.
- If this is your first time using Athena, you’ll need to specify a query result location in S3. Click “Settings” in the top right corner and enter the S3 bucket path where you want Athena to store query results (e.g.,
s3://my-awesome-data-lake/athena-results/). Make sure you have permissions to write to this location. -
In the Athena query editor, you’ll see a list of databases on the left. Select the Glue database you created earlier (e.g.,
my_data_lake_db). - You should see the table created by the Glue crawler (e.g.,
population_data). -
Now, write a SQL query to analyze your data. Here’s a simple example:
SELECT *
FROM "my_data_lake_db"."population_data"
LIMIT 10;
Replace
"my_data_lake_db"."population_data"with the actual names of your database and table. -
Click “Run query.”
Athena will execute your query against the data in S3 and display the results. Boom! You’re querying your data lake!
Key Takeaways and Next Steps:
- Serverless Simplicity: We built a powerful data analytics solution without managing any servers.
- Scalability: S3, Glue, and Athena scale automatically to handle growing data volumes.
- Cost-Effectiveness: You only pay for the resources you use.
Now, let’s take it a step further!
- Data Transformation: Use Glue jobs to clean, transform, and enrich your data before querying it with Athena.
- Data Visualization: Connect Athena to data visualization tools like Amazon QuickSight to create interactive dashboards.
- Data Security: Implement IAM policies and S3 bucket policies to secure your data lake.
- Partitioning: Partition your data in S3 based on date or other relevant criteria to improve query performance.
- Data Catalog Improvements: Explore advanced Glue crawler options for more precise schema inference and management.
Building a data lake can seem daunting at first, but by breaking it down into simple steps, you can unlock the power of your data and gain valuable insights. This simple example is just the beginning! Experiment, explore, and adapt this approach to meet your specific data needs. Happy querying!